Showing posts with label homemade. Show all posts

Wednesday, March 30, 2011

Making Body Butter Bars


I have a project that I've been meaning to do for quite a while now. I had all the supplies, I worked out my process, everything was ready to go...........then 3 months went past. In the last three months I forgot all about my project, I have so many that's not a hard task for me but when I was reading Keeper of the Home yesterday my project came back to me. YES!

This idea originally came to me after my soon-to-be-husband fell in love with the Buffy Body Butter Bar from Lush. He didn't care so much about the exfoliation aspect, but he really enjoyed being able to moisturize in the shower. I was really happy that he enjoyed Lush's product (I like stuff from Lush, I figured it would be easier for me to get away with buying stuff from there), but they are $12 each. That was a cost that I couldn't stomach to pay all the time (and I didn't particularly care for the scent either). I found this great informative youtube video on how Lush makes its body butter bar and knew I could do it at home myself.

Body Butter Bars

You'll Need
Mold (I used a silicone cupcake tin)
Double boiler of some sort
Shea Butter
Coconut Oil
Beeswax

1) Determine how much weight your mold can hold. I did this by placing my mold on my kitchen scale, hitting tare, and pour water in to the desired fullness. If you're using something like a cupcake tin, or something with multiple cavities you can just fill one and then multiply by the number of cavities. My cavities held 2 oz of water, so I needed a total of 24 oz of oils.

2) Measure oils. I decided that I would use equal parts of beeswax, shea butter and coconut oil, so I measure out 8 oz of each.


**NOTE: When buying beeswax, it's probably better to buy the pastilles or 1 oz blocks. I bought the 1 lb blocks because they were cheaper (I regret that decision). It took me 10 minutes to figure out how I was going to break down that block of beeswax. I ended up just breaking it into pieces with a hammer.**


3) Melt oils. You can do this step however you feel comfortable. Options include in the microwave, crockpot or using some sort of double boiler. My double boiler was actually a steaming pot that I set a 4 cup, glass Pyrex measuring cup in (it made for easy pouring).

I did find that the oils melted faster if I put the lid on. Also the beeswax takes the longest to melt so you might want to put that on the bottom.
This is what everything looks like when it's melted. Those little bits on top are beeswax that didn't fully melt. (Don't worry about them)

4) Pour melted oil into mold.

5) Put mold in freezer. My bars were completely cooled in 33 minutes. (I know because that's exactly how long I was exercising)

6) Remove from mold and enjoy! After taking my bars out the mold, I wrapped the ones I didn't intend to use right away in wax paper and put them in the freezer. The one I'm currently using is in a metal tin in my bedroom.


That's it. It's super easy and doesn't require a lot of work. I guess the real question is economical is this?

7 lbs coconut oil: $17.95
5 lbs shea butter: $50.85
5 lbs beeswax: $52.60
7 lbs = 112 oz
5 lbs = 80 oz
17.95 / 112 = $0.16/oz coconut oil
50.85 / 80 = $0.64/oz shea butter
52.60 / 80 = $0.66/oz beeswax
($0.16 x 8) + ($0.64 x 8) + ($0.66 x 8) = $11.68 for 12 body butter bars
OR 
$0.97 per bar

Not to toot my own horn but I don't think anyone could deny that this wasn't a successful experiment. Up next I'm going to be making stick deodorant. I just have to find some of those little tubes first. 

Until next time, 
Kellan


Monday, January 25, 2010

Fabric Softener for Pennies

When I submitted how to make laundry powder I also meant to submit a post for my cheap and easy fabric softener................but I forgot so here it is:

You'll Need:
1 Downy Ball
Distilled White Vinegar


Directions:
Pour vinegar into Downy Ball to the desired level
Pull the plug and throw it in the washer.

It's that simple......feel a little cheated? I did when I figured this out.

Until next time............................
KAC

Homemade Yogurt: Greek and Whipped

I'm still unpacking so I don't want to take too many pics of my house right now......it's a little depressing but since one of the first things I unpacked was my slow cooker I've been using it a lot.

I found the technique for making yogurt in the slow cooker from Crockpot 365 and tried it out last weekend it worked out pretty well. I'm not going to repost what Stephanie already wrote because that would be redundant, but here are some small variations that I made.

Variation #1: Greek Yogurt

I LOVE Greek yogurt so I thought I would make some at home. I followed Stephanie's Crockpot Yogurt Recipe and after the incubation period I poured my yogurt into a colander lined with cheese cloth.
I put the whole thing in the refrigerator overnight. (This picture if from my batch I'm working on now. I used a whole gallon of milk and an hour ago the colander was filled to the brim.) Occasionally it's necessary to pour out the liquid that's accumulated in the bowl. You could keep it if you wish. I don't, I haven't thought of anything to use it for yet.

Once you've gained maximum thickness (I'll post pics tomorrow) you can then do whatever you want with your yogurt. I pureed a pint of strawberries and a little honey with my immersion blender and then blended the yogurt and the fruit together. This is what it looked like 10 days later:
No artificial flavors, coloring or preservatives. ABSOLUTELY DELICIOUS!

Variation 2: Whipped Yogurt Not Working Out Like I Planned

I doing this tomorrow but basically the plan is to take my plain Greek yogurt and whip it in my KitchenAid. I haven't actually tried this yet, so this is all theoritical right now. I'll let you know how things go over tomorrow (fail or succeed). My goal is something similar to Yoplait Whips yogurt. I'm also in the process of looking for a orange creme flavoring recipe. That's the flavor Dj really likes so I'm trying to make it (no success thus far but maybe soon).

Update 3/10/2010: To date I still haven't gotten the whipped yogurt to work out. I'm still working on it but hopefully I'll figure something out soon.


Until next time...........
KAC

Tuesday, December 29, 2009

Homemade Cleaners: Laundry Powder

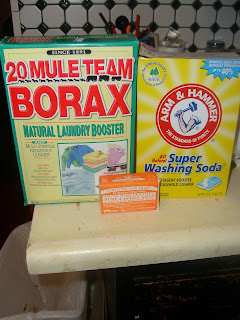
So my first experiment was making laundry powder. (I got the idea from BrownThumbMama) I made a small variation to the recipe and my food processor hasn't come yet so I had to grate the soap by hand. I used a bar of Dr. Bronner's Magic Soap instead of Fels Naptha but I personally think it came out just as well and this way I didn't need to add the essential oil. My house smells fantastic right now, so I think this was a great experiment overall. Eventually I might get around to making the laundry liquid, but I really don't think I want to do the extra work.

This was a great investment. I have LOTS of washing soda and borax left, so there will be lots more experimenting. Overall, it's taken longer for me to write this post then it did for me to make the laundry soap. I think I could finish the whole process in less than 4 minutes once my food processor comes.

I'll try to remember to take pics for the next batch.

UPDATE:
My food processor came and I made another batch. It took me about a minute to make this batch. So here's what I did: 


I gathered my ingredients


Grated my bar of soap (I used my food processor). 


Mixed in the borax and washing soda


Put in the scoop (I found a 2 tbsp coffee scoop in the junk drawer)


I also calculated the price per batch. Here's what I came up with:
1 cup of 20 Mule Team borax: $0.48
1 cup of Arm & Hammer Washing Soda: $0.33
1 bar Dr. Bronner's Magic Soap: $2.64
GRAND TOTAL: $3.45


Per my calculations, I think this recipe should yield about 32 load (PRETTY GOOD, RIGHT?)


Update 1/25/10: My food processor apparently cannot handle chopping up the soap. (I have a KitchenAid mini chopper). However, I do have the Shredder/Slicer attachment for my KitchenAid Stand Mixer. Thus, I grated the soap with the stand mixer, then put it into the food processor to get that fine soap dust that's needed for proper dissolution. Problem solved!


Until my next experiment......

KAC

Make Your Own Snuggie/Slanket

For Christmas this year I decided to make my friends and family Snuggies/Slankets/Blankets with sleeves (whatever you choose to call them). It takes about an hour to make one from start to finish (I made 33). Overall the process is relatively easy so here's how to make one:

Start with washing and drying 3 yards of fleece.


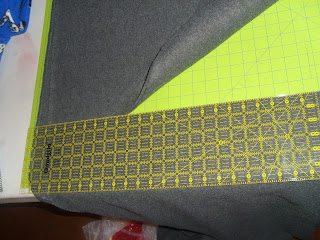
Then fold the fabric in half so that it's half of the normal width, measure 24 inches from the top.


Cut the fabric at the 24" mark, this section will be your sleeves.


Cut along the fold of the fabric to give you two pieces of fabric that are 30" wide and 24" long. Set this aside for now.


With the remaining fabric measure 20 inches from the top and 10 from the fold (this is the top of your sleeve). Your sleeve hole needs to be 9 inches from top to bottom and 6 inches from left to right. I mark my measurements with pins and use a rotary cutter to cut out the holes.


As you can see, it doesn't matter if the hole is perfect......imperfections can be covered up later.

Next, I hem the edges. To do this I fold my fabric over 1 inch.


Then fold again and pin. The second fold depends on which side of the Snuggie you're working on and your preferences. I use a 3" hem for the top and 1" to 2" for the remaining sides depending on the fabric. For this particular fabric I did a 2" seam because the fabric was very thick.


If making multiple Snuggies, I would suggest getting this much finished before moving on to the sewing. It makes things go MUCH faster.

Okay, now that it's all pinned, just sew along the outside and attach the sleeves.

Update 1/25/10: I'm still working on Christmas presents but I moved and it's been an uphill battle. I'll finish one day............hopefully. 
Until then.......