Friday, October 25, 2013

New Baby, Azure Standard and Applesauce

Hi All!,

Firstly, I know that I've been MIA for a while. A brief update on what's been going on in my life: I got pregnant and had another baby! I now have two children under the age of 2......actually I have two children under 18 months because Tres is only 16 months, crazy I know.

Introducing my second son: Nehemiah


Have any of you heard of Azure Standard? If not, it's a organic and natural food grocer that does monthly drops to various communities across the country. They've finally made it to Michigan and we're SUPER excited at my house. So excited in fact that I volunteered to be the drop site manager. (So if you live in/near southeastern Michigan and would like to join us please contact me, here's a link to our Facebook Group). Azure coming to my community is really going to help me get our kitchen the way I want it (read organized and functional). Additionally it'll give me some fresh material to post about, especially while I work on the organization part.


If you're interested in seeing Azure has a drop near you contact the trucking company they use, Covenant Ranch Trucking, 785-380-0034. They'll be more than happy to let you know what's near you. If there's not one, start raising awareness in your area and maybe they'll expand to you.

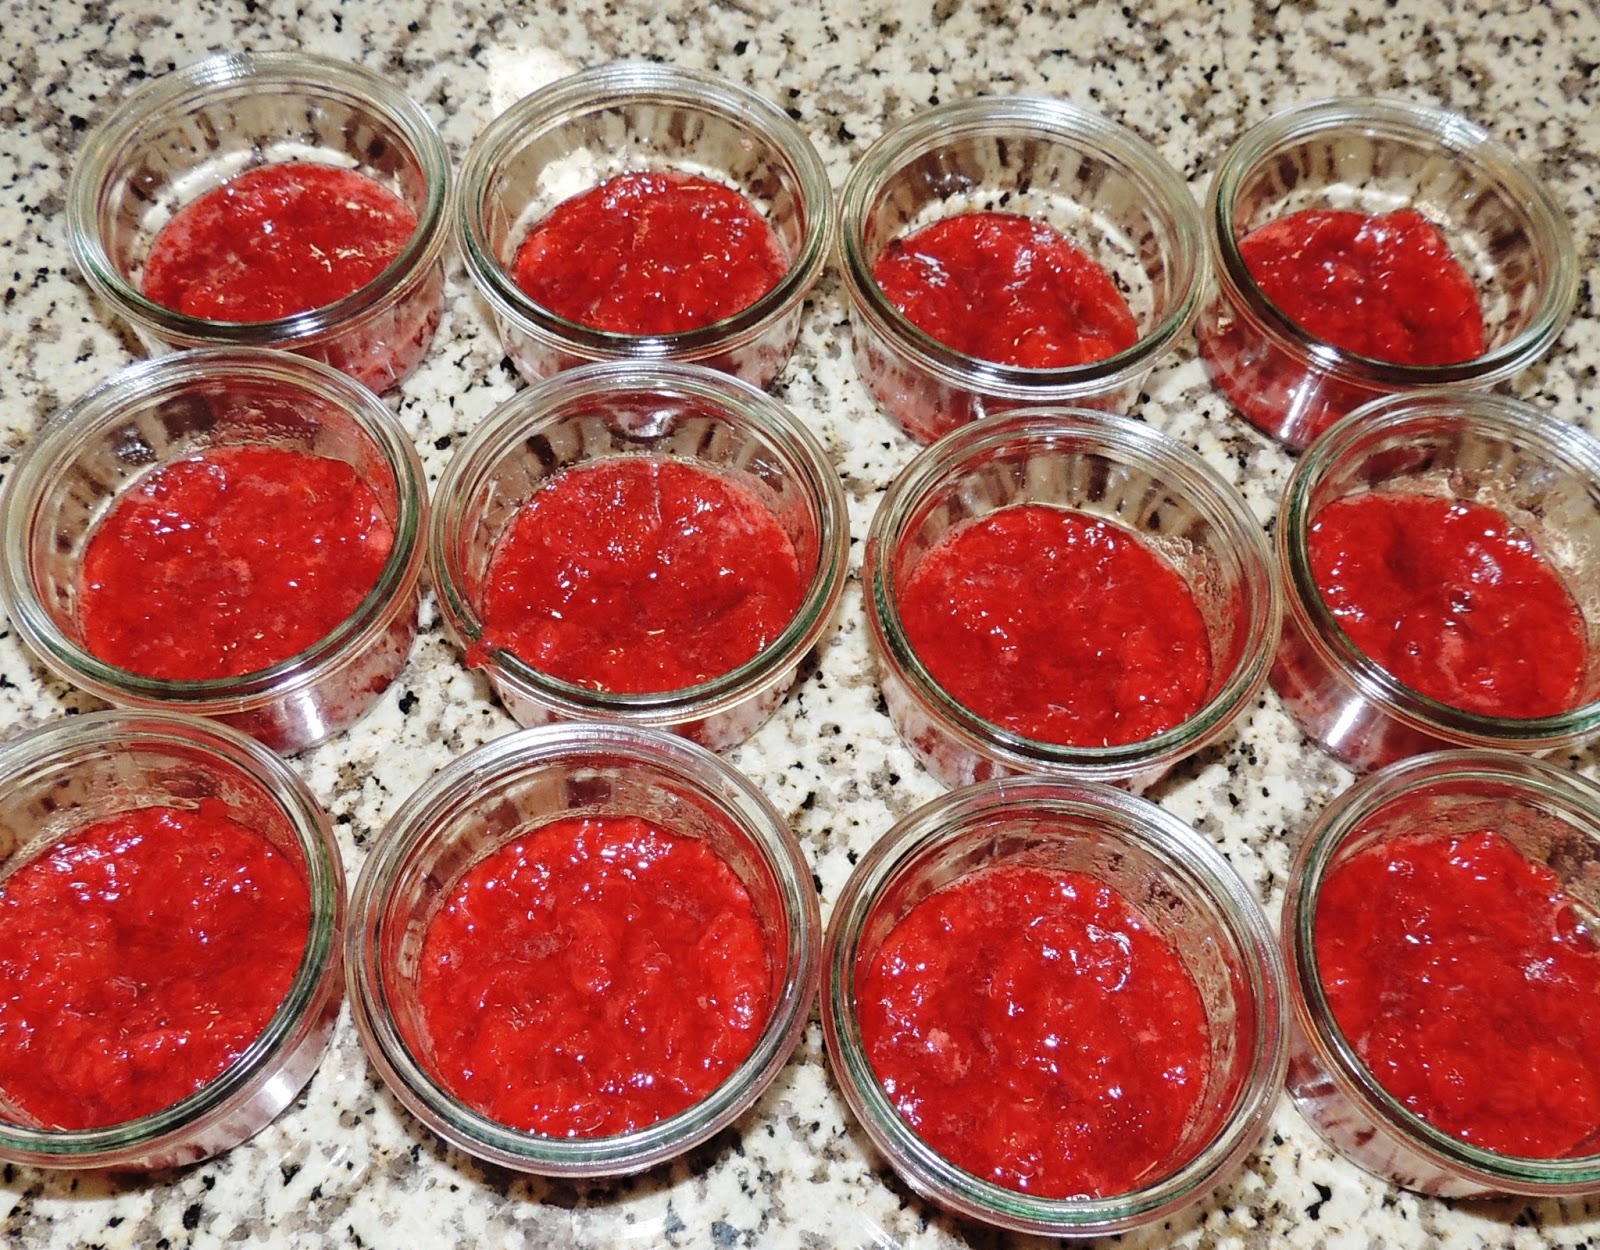
Today was my community's first drop and it went pretty well. I bought a pretty good haul, it included oats, basmati rice, broccoli florets, strawberries and gala apples. LOTS AND LOTS of gala apples..............20lbs to be exact. What do I plan to do with all those apples? Make applesauce of course!


Strawberry Applesauce
adapted from Family Feedbag

5 lbs apples (I used organic gala but whatever tickles you is fine)
2 lbs strawberries (fresh or frozen)
3 cups of water

Special equipment: chinois

Steps:

  1. Wash fruit
  2. Quarter apples (If you're not using the chinois then you'll probably need to peel core the apples as well........sorry)
  3. Add apples, strawberries and water to a large pot. Cook on high until water begins to boil, then turn down to medium and simmer for about 35 minutes.
  4. If you using the chinois, then spoon into the the chinois and press through using the wooden dowel. If you're not using the chinois, then process with whatever you have (food processor, blender, immersion blender).
  5. Chill and enjoy


If desired, you could can whatever excess you/your family is not going to eat right away, which I was going to do. HOWEVER, I did not have the correct size Weck jars on hand to do so. I only have large mason jars but I have gotten away from canning with regular mason jars since I found out that there's BPA in the compound used on the sealing lid. Due to this I ended up freezing my excess applesauce in the mason jars instead which is quicker and less labor intensive. I have an upright freezer in my basement, if you don't then eat quickly. LOL.

A word on organization: I didn't mention previously that I purchased 25 lbs of oats and rice, so I'm searching for cute jars to store it in on my counter. I've been thinking about the Anchor Hocking Heritage Hill jars, the question is what size? I'm torn between the 1 gallon and 2 gallon for oats, flour, rice and wheat berries. What do you guys think, would a 2 gallon glass jar be to big?

Until next time, 
Kellan

Thursday, January 17, 2013

Fruit on the Bottom Yogurt (or top)


One of my all time favorite snacks is yogurt, especially fruit on the bottom strawberry Chobani. Only problem is that I feel guilty every time I eat one. Why? Basically they go against a lot of the new guidelines that I set for myself. In the grand scheme of things Chobani is one of the better yogurt option on the market but I still felt bad for the following reasons:


  1. Chobani is non-fat yogurt - I don't do non-fat, low fat or skim anything for a number of reasons but they all break down into 3 main categories: if it was suppose to be fat free God would have made it that way, fat makes everything more delicious and fat is necessary to absorb a number of vitamins and minerals. (So all you guys eating salad with fat free dressing, it's not doing ANYTHING for you)
  2. Too many ingredients - I looked up the ingredients here. I'm always skeptical when a label says "natural flavors". What exactly does that mean? Also, groupings such as, fruit and vegetable juice concentrate, makes me leery. Why can't they just say what fruit and vegetable juice concentrate it is? And what is locust bean gum? My new rule is to try to stay under 5 ungrouped ingredients that I can readily identify. 
  3. It's expensive - I don't know about where you live but in Southeastern Michigan, Chobani yogurts are usually retail for $1.50 each. We eat a lot of yogurt, $1.50 adds up rather quickly.  
So I set out to make my own fruit on the bottom yogurt that was just as tasty, cheaper and better for my family. I think I did a pretty good job AND it's super easy. 

Homemade Fruit on the Bottom Yogurt

Makes a dozen 5.6oz yogurts
  • 20 oz frozen fruit (preferably organic), I used strawberries
  • 1/4 cup honey
  • 1 quart yogurt (preferably raw and/or homemade)
Just as an FYI 20 oz of frozen fruit is usually two of the smaller bags.

Dump the frozen fruit and the yogurt in a sauce pan, pour on honey. 

Cook for about 40 minutes on medium heat stirring occasionally. It will get frothy.

Let fruit sauce cool completely then divide evenly amount containers.

Top with yogurt and either enjoy now or store and enjoy later!

It's that simple. I recently discovered Weck jars, which are what I store my yogurts in. They're canning jars typically used in Europe but, like our beloved mason jars, have lots of other uses. I really like these because they have glass tops. I don't know if you heard but apparently there's BPA in the lids used for mason jars (depressing, I know).  

I think this will work with any fruit. We like strawberry so that what I made but you might like something else. Let me know how it turns out.

Until next time,
Kellan

Thursday, January 10, 2013

Soaked Pancakes for Now and Later

I've decided that in 2013 I am going to work on getting rid of all processed foods. In order to do that I need to make large batches and freeze the extras. Now the real question is how am I going to achieve that feat, considering the first quarter of the year is always a hectic time for me. My plan, do 1 or 2 recipe conversions a week and freeze the extras. This week's recipe: PANCAKES!!!!

I love pancakes. Love. Love. Love. Pancakes. Here's how I make them:


Soaked Whole Wheat Pancakes


11.2 oz sifted whole wheat flour
2.5 cup filtered water
3 tbsp whey
1.3 oz sugar
0.2 oz baking soda
0.4 oz baking powder
0.2 oz salt
0.5 – 1 cup buttermilk
3 eggs
2.7 oz butter

Sift whole wheat flour to remove most of the bran, discard bran.

Weigh out 11.2 oz of the sifted flour. Add water and whey. Mix and cover with towel for at least 8 hours. You should have something that looks like this:

After the soak, strain all the extra water off the wheat.

Mix in remaining ingredients and make pancakes as usual. 


This recipe makes about 20 LARGE pancakes. To freeze for future eating, just place the pancakes on a cookie sheet in a single layer and put in the freezer for a few hours. I didn't have enough cookie sheets for that so I separated my pancake layers with cling wrap.

(My sad empty freezer) Once fully frozen bag as you see fit. I'm able to fit 2 pancakes in a quart size freezer bag. To reheat put in a 350 degree over for 10-15 minutes.

The real question is if the pancakes taste the same and have the same texture after being frozen. The honest answer is yes and no. Yes, they taste just as delicious but no they don't have the same texture initially. I found that after being reheated in the oven they were a little crisper then when I originally made them but once I slathered on the butter I couldn't tell the difference.

I forgot to take a pic before I started eating............don't judge me.

Overall I would say this experiment was an awesome success. If you'd like to read more about the importance of soaking grains please check out this post by Sarah the Healthy Home Economist.

Until next time,

Kellan

Thursday, November 15, 2012

Recipe Experiment: Taco Seasoning

I have a confession: I love beef. Like really  really love it. It's rare that I eat meat other than beef, thus I'm always looking for new things to do with it. That being said, I thought I would share one of my quick go to dinner recipes: TACOS!!!!!!!!! (Or taco salad at our house)

There was a LONG period where I didn't eat tacos because I couldn't find taco seasoning from a grocery store that I would even consider consuming. I took me a few months to find a recipe that I actually liked and then tweak it until it was perfect. My inspiration recipe came the Food Renegade blog, the recipe as posted I found to be a little bland for my taste but it was a great place to start. This recipe works with beef, poultry or pork, it's just that awesome.


Homemade Taco Seasoning


Per pound of meat, mix the following spices:
2 Tbsp chili powder
1/2 tsp garlic powder
1/2 tsp  onion powder
1/2 tsp dried oregano
1 tsp smoke paprika
3 tsp ground cumin
Salt and Pepper to taste


  1. Mix together all spices except salt and pepper; set aside. 
  2. Season meat with salt and pepper; brown
  3. Pour taco seasoning over browned meat, stir. 
  4. Add 1 1/4 cup to 1 1/2 cup of water per pound of meat; cover and simmer until reduced. Stir occasionally.
The amount of time that you allow the meat to simmer and reduce depends on your personal preferences (how much sauce you like). When I'm making meat for taco salad I leave a lot of sauce because it's the most awesome "dressing" but when I'm making tacos I don't like lots of sauce because I make a huge mess. 

I hope you enjoy this recipe as much as we do. We eat taco salad at once a week (sad I know). I'm currently perfecting homemade fruit snack. EXCITING!

Until next time, 
Kellan


PS: Look at Tres.........he's SO cute!


Monday, November 12, 2012

The Move

This moving experience has been A LOT more than I originally assumed. We're almost completely unpacked. The last part of the house that needs works is my office/craft area. It currently looks like this:


I've gotten almost everything sorted, just have to find a home for all of it. Please bear with me a few more days. I'm hoping to have everything put away by the end of week.

Until next time...........

Friday, August 3, 2012

Cloth Diapering: Our Setup

Hey!

If you read my last post you know that I was pregnant with my first child. Tres was born June 22 at 8:55pm. He weighed 7 lbs 14 oz and was 20 inches long.


He has been a great addition to our lives. I thought I would take some time to write out my experience with cloth diapering. Long before I ever got pregnant I decided that when I had children they would be cloth diapered, my husband wasn't sold on the cloth diapering at first but he has come around.

Making the decision to cloth diaper isn't a simple one, it is definitely more than just saying "I'm going to cloth diaper". That is a great start but you have to decide things such as :what kind of cloth diapers you are going to use, whether to use a diaper service or not, what kind of detergent to use, how many diapers to buy, etc. When it comes to cloth diapering execution is very individualized, what works well for me might not work well for you and that's ok. I'm hoping by explaining our setup and how we decided upon this setup we will be able to help someone decide to cloth diaper their children. Remember: Cloth diapering is best for your baby and the environment.

Our Setup
Our current cloth diapering setup consists of 36 prefolds, 8 covers and 26 cloth wipes.

When I was deciding which cloth diapers I was going to be using I considered 4 things

  • Cost
  • Ease of use
  • Construction materials
  • Laundry options
As far as cost is concerned, to me one of the many advantages to cloth diapering is saving money. The price of cloth diapers can vary greatly, it just depends on what you choose. I chose unbleached prefolds from Green Mountain Diapers, based on my research these are the best prefolds on the market. Green Mountain prefolds come in sizes, we decided to skip the newborn size and go directly to small. The small size is suppose to fit babies 10-15 lbs. I had a feeling that Tres would be about 8 lbs at birth and I was fine with the prefolds being a little  big for a couple of weeks. The small prefolds from Green Mountain Diapers are $28/dozen.

Prefolds require some sort of diaper cover, there is no getting around that. I knew that I didn't want to have to have four or five sets of diaper covers, so I was looking for covers that could be grow with my baby. I ended up deciding on Thirsties Duo Wrap. These covers come in two sizes, size 1 is for babies 6-18lbs and size 2 is 18-40 lbs. The covers come in great patterns and colors but even better they are only $12.75 each and are available for free 2 day shipping if you have an Amazon Prime account (which everyone should have, it's awesome). The duo wrap comes in snaps or velcro, I chose snaps because while researching I found that babies learn to open the velcro and take the diapers off. That's not something that I ever want to experience. 

I made my own cloth wipes. My wipes are 10x10 squares made from two pieces of flannel. I bought 4 yards of flannel to make the wipes from Joann's, with a 50% off coupon the fabric only cost me $13. I have found that 26 wipes are not enough. I'm going to make a tutorial on making the cloth wipes once we get moved and unpacked.

Lastly would be laundry options. I knew that I didn't want to use a diaper service because I am very particular about how my laundry is done and what products are used. I found that the type of detergent used on cloth diapers is very important because it is possible for the diapers to loose their absorbency if the wrong detergent is used. I'm lucky enough to have a cloth diaper store close to me and they have a great website. One of the sections in the information section which includes detergents they recommend and washing instructions. I chose to use Tiny Bubbles detergent because it is not scented. (I hate the artificial scents that are used in cleaning products. If you're a person that like scents I believe Rockin' Green has a lot of options to choose from) I will admit that Tiny Bubbles is a little pricey but I was able to buy the 6 pack from Amazon which saved me almost $30.

We also have two diaper pail liners, 3 snappis and a diaper pail. To date we've spent just under $300. In the future we will have to purchase bigger prefolds and covers. As of right now I believe I am going to 3 dozen medium and 3 dozen x-large prefolds as well as 8 size two covers, so I anticipate spending another $300. I don't think that $600 is bad. 

Washing
Laundry is extremely simple. We received diaper sprayer as a gift. Sometimes we use it..........sometimes we don't. The poop of breastfed babies is water soluble so it is not a big deal that we don't spray the poop off in advance. We literally just throw all the diapers, wipes and the pail liner in the washer together with hot water and everything but the covers go in the dryer. That's it! Easy peasy. 


Here's a recent picture of Tres in one of his diapers:

Until next time,
Kellan


Sunday, March 11, 2012

Grind Your Own Meat!!!!! 70% of Ground Meat at Supermarkets Contain "Pink Slime"

I was reading blog posts today in my Google Reader and came across this post from Backyard Farming. The cut and dry of it is that 70% of ground meat sold at supermarkets contains "pink slime". Pink slime is basically trimming that would usually be used for pet food that has been sprayed with ammonia to make it "safe" for eating. What's safe about eating meat sprayed with ammonia? I would think that is something that a person would do if they're trying to kill someone. See the video below if you don't believe me.


What's the solution? Grind your own meat. It's not hard and it doesn't require expensive equipment. I've been saying to myself that I was going to grind my own meat for a long time, well the time is now. Alton Brown did an excellent tutorial on his show Good Eats about using a hand grinder (he was making pork sausage but it's the same technique), which I found on Youtube. Please view the clip, the part about grinding meat start at the 5 minute mark.


I found the exact grinder that he's using in his video on Amazon and it's only $35. I will be ordering one as soon as I finish this blog post. You can also "grind" meat in the food processor if you have one, it's not going to be as fine of a texture but it will get the job done. 

Pass the word!

Until next time, 
Kellan