Showing posts with label sewing. Show all posts

Wednesday, November 10, 2010

Reversible Reusable Tote Bags

So I really want to stop using plastic and paper bags when I'm shopping, thus I've been looking to make some reusable bags. I've looked through TONS of blogs and I finally came across a tutorial that I like from Green and Unabashed.

I really liked the test bags but I made quite a few changes to the construction. So here's how I make reversible, reusable tote bags:

Items Needed
1 yard printed cotton or home decor fabric
1 yard solid or coordinating printed cotton or home decor fabric
thread
scissors
rotary cutter (optional but recommended)
scissors
serger (optional but recommended)
self - healing mat

**Warning: DO NOT CUT OFF THE SELVAGE! You're going to need every bit of these 2 yards of fabric. I promise the selvage will be hidden. Just trust me.**

The first step is to press your fabric then fold lengthwise and press fold flat. I suggest that when folding your fabric that you have the right side of the fabric on the inside, it makes things easier later.

Measure 6 inches from the top of the fabric and cut. Set this piece aside, we'll get back to it later.

Fold your fabric in half widthwise and measure. Hopefully you're using fabric that is 44 or 45 inches wide, which means that your halfway point should be 19 to 19.5 inches from the top, cut at your midpoint. At this point you should have two pieces of fabric that folded is 18 inches wide and 19 inches long.

Cut 3 by 3 squares from the bottom of the fabric.

Remember that 6 inch strip of fabric from earlier? It's come back into play now. So first you need to iron out the fold crease. Next make cuts every 8 inches, this will give you four 8" x 6" boxes and an extra piece.

You need a 5" x 3" template. I cut a 8" x 6" box out of a cereal box and then cut a 5" x 3" whole in the middle. You don't have to do that, honestly you could cutout a 5" x 3" box out of a piece of paper, as long as you center it. Regardless of how you make your template trace the 5" x 3" and draw something that resembles  an envelope. IT DOESN'T HAVE TO BE PERFECT!
Open the large piece of fabric and pin the box to the top, right sides together. The box should be centered on the large piece, which basically means there should be 5 inches on either side of the box. (See I told you the envelope didn't need to be perfect) 

Sew along the OUTSIDE of the box your just traced.

Cut along the inside "envelope" lines, cut as closely to the corner stitches as you can but DO NOT cut through  them.

Pull everything through the hole you just made and press the opening down.

Serge down the side and across the bottom.

Now open the holes at the bottom of the bag, lay the top of the opening on the bottom of the opening and sew closed. Repeat on the other side.

Repeat all the above instructions with the second yard of fabric. 

Once you have two bags constructed, put one inside of the other, right sides together and serge the two bags together along the top. Leave an opening so you can flip the bags to the right-side-out.
Press the seams down and top stitch.

I also top stitch along the bottom of the handle opening but that's optional.


There are a lot of steps involved but overall it's a quick process and the end result is fabulous.

Give it a try and let me know how your bags came out.

If you read this tutorial and think, "That's really cool but I'm not/can't/don't have the time to do all that" I sell these totes. http://www.etsy.com/shop/kaclopton

Until next time,
Kellan

Wednesday, September 8, 2010

Cloth Toilet Paper AKA Family Cloths: Thoughts and a Tutorial

So in the quest to get rid of EVERYTHING disposable in my house I recently came across this Walk Slowly Live Wildly blog post about cloth toilet paper. I right away thought it was super cool and wanted to try it right away, I'm weird like that. But I had to convince Dj that this was a good idea before I actually tried it. Surprisingly he said he also thought it was a good idea and was willing to give it a try (I was shocked). 

I looked online to see what these things were selling for and I was a little shocked. Not to hate on anyone's hustle but these people CANNOT be serious. $11 for a dozen? I think not, especially not when I have SO MUCH fabric already at home. 

I have a quite the fabric stash, mostly because I love to buy stuff on sale. So I used this reduce, reuse, recycle flannel that I got from JoAnn's on super sale for $1.50/yd. I've had it for a while, I was initially supposed to make cloth pads out of it but hadn't gotten to that part of the stack yet.........o well. 

MAKING CLOTH TOILET PAPER (FAMILY CLOTHS OR CLOTH WIPES)

After washing and drying the fabric it obviously needs to be ironed. Could you skip this step? Yes. Would I suggest it? No. Do you honestly need to wash the fabric first? YES!

After ironing out the wrinkles fold the fabric together like a hot dog bun (selvages together in the center, rough edges on the ends). Iron on the fold. Again, could you skip this step? Yes. Would I recommend it? No. 
Next measure your fabric (it shrunk in the wash) and decide big you want each wipe to be. I don't like to waste fabric so I divided my fabric evenly into 6 in wide strips. It really helps if you have a rotary cutter for this. (If you don't have one but want one, look on eBay. I bought a Gingher rotary cutter and spring loaded shears for $15.)
I then turned each strip and cut them in half, which  ended up being 10.5 inches. If you're making 2 ply wipes you don't need to cut the areas that are on the fold but if you are making 1 ply cut the strips on the fold in half. I'm making 2 ply.
The yard of fabric yielded me a dozen wipes.
Next sew the two pieces of fabric together. I have a serger so that's what I used but if you don't have one you can use a regular sewing machine. Below is a great video on how to do this:
Now that you've sewn the wipes together you have two choices you can either wet them and put them in some sort of container to use for wet wipes OR leave them dry and just set them out. I did both so I have wet wipes and dry wipes. 

For the wet wipes, I filled my bathroom sink with water, added some essential oils, put the wipes in and then put them in the a diaper wipe warmer (that I got off craig's list for $5).
For the dry wipes, I found a cute yet simple box, folded the wipes (a little haphazardly) and threw them in.
I found this plastic office supply box to put the used ones in until wash day. And that's it.


I literally just did all this today so I haven't actually tested everything out yet but I'm excited. I'll be sure to update on the progress. 

Here is some additional info about cloth toilet paper from other bloggers:
Cloth Wipes Q&A Part I and Part II

I am going to email Deanna @ Crunchy Chicken to see if she's doing the Cloth Wipe Challenge this year as well. 


Until next time...........

Tuesday, December 29, 2009

Make Your Own Snuggie/Slanket

For Christmas this year I decided to make my friends and family Snuggies/Slankets/Blankets with sleeves (whatever you choose to call them). It takes about an hour to make one from start to finish (I made 33). Overall the process is relatively easy so here's how to make one:

Start with washing and drying 3 yards of fleece.


Then fold the fabric in half so that it's half of the normal width, measure 24 inches from the top.


Cut the fabric at the 24" mark, this section will be your sleeves.


Cut along the fold of the fabric to give you two pieces of fabric that are 30" wide and 24" long. Set this aside for now.


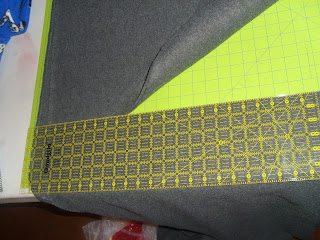
With the remaining fabric measure 20 inches from the top and 10 from the fold (this is the top of your sleeve). Your sleeve hole needs to be 9 inches from top to bottom and 6 inches from left to right. I mark my measurements with pins and use a rotary cutter to cut out the holes.


As you can see, it doesn't matter if the hole is perfect......imperfections can be covered up later.

Next, I hem the edges. To do this I fold my fabric over 1 inch.


Then fold again and pin. The second fold depends on which side of the Snuggie you're working on and your preferences. I use a 3" hem for the top and 1" to 2" for the remaining sides depending on the fabric. For this particular fabric I did a 2" seam because the fabric was very thick.


If making multiple Snuggies, I would suggest getting this much finished before moving on to the sewing. It makes things go MUCH faster.

Okay, now that it's all pinned, just sew along the outside and attach the sleeves.

Update 1/25/10: I'm still working on Christmas presents but I moved and it's been an uphill battle. I'll finish one day............hopefully. 
Until then.......