Monday, November 29, 2010

Using Leftover Turkey: Prep Day

I know that I was supposed to be doing a week of bread next..........but after making 20 dozen rolls for Thanksgiving, I'm really not feeling making ANY bread for at least a week. When we were cleaning up from Thanksgiving dinner my grandmother gave me the turkey carcass, she figured I could do something with it. I hate to disappoint so I'm going to make as many turkey dishes as I can with the carcass.

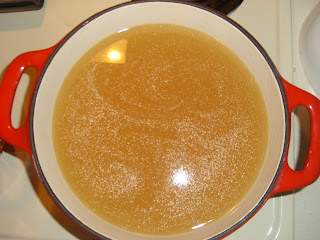
As with any carcass, the first use is to make stock.

Isn't that beautiful? Making this stock was crazy easy, I put the carcass in the slow cooker, filled with water and let it cook on low overnight. I turned the slow cooker off around 10:30 this morning but I didn't pick the turkey until 7 pm. Why the long wait? 1) I've been doing laundry and forgot. 2) I don't like burning myself (don't ask).

WARNING: picking turkey is not pretty or fun. There's no gadget that you can use for this, so mentally prepare yourself and stick your hand in. All you have to do is separate the bones from the meat. Sounds easy right? It is..............just do it and don't think about it.
Once you've finished separating the meat from the bones strain your stock and your done! Super easy right?

I'll be back tomorrow with use #1 for leftover Thanksgiving turkey. 

Until next time, 
Kellan

Wednesday, November 17, 2010

The Chicken Experiment - Final Thoughts

The rest of my week wasn't quite as successful, mostly because I wasn't feeling all that great.

Tomato Soup
I used some of the stock I made to make tomato soup from a recipe I saw on Keeper of the Home. When I was originally reading the recipe I was trying to figure out what the baking soda was for. I didn't realize until I was actually making the soup that the baking soda was to neutralize the acid in the tomatoes. Since I used tomatoes that I canned myself, they had a little extra acid from the lemon juice I put in bottom of all my jars. Overall, the soup was really good but thin. I ended up reducing mine by a lot. I will definitely make this soup again but I'm only going to use about 2 cups of stock instead of 4.

Chicken & Broccoli Fettuccine Alfredo
I was reading one of my favorite blogs, Heavenly Homemakers, and found a great recipe for easy alfredo sauce. When I saw it, I had to make it. As I've said before, I LOVE TO EAT and one of my favorite things is alfredo sauce. That's not to say that you can slop alfredo sauce on anything (I once ordered the blackened cajun chicken alfredo from Red Lobster, it was horrible).

Ingredients:
half a chicken worth of picked chicken
1 batch of Heavenly Homemakers easy alfredo sauce
1/2 bag of frozen broccoli
fettuccine noodles

Make the alfredo sauce first, then throw in the chicken and frozen broccoli.
Turn the pot on medium/low, put a lid on and let everything hang out for about 15 minutes.
Cook the amount of fettuccine you feel is adequate. (I personally like more sauce and toppings than pasta so I don't make a lot but that's up to you)
You really don't have to drain the pasta, I fished mine out with tongs and threw it directly into my sauce.
Mix everything together and serve.

It's tasty, delicious and super easy.

At this point we had been eating chicken for a little over a week. I couldn't think of anything else to make and honestly I was a little tired of chicken. So I fed the rest of the chicken to the cats. I recently discovered that feeding them cat food was making them sick so I've been feed them tuna, chicken and turkey (cats are carnivores). They were quite pleased. They had been eyeing the chicken since I brought it home.

Final Thoughts
I definitely think I proved my original theory that we could eat off two chickens for a week. I actually think we could have went two weeks but I'll leave that for another experiment. It definitely takes creativity and research to try to use the same main ingredient over and over again.

I'm currently working on a bread experiment and I just ordered potassium hydroxide so I will be making liquid soap soon (SUPER EXCITED ABOUT THAT).

Until next time,
Kellan

Friday, November 12, 2010

The Chicken Experiment - Midweek Update

This past Sunday I decided to try an experiment this week, that is supposed to be the purpose of this blog. I bought two whole chickens (I did cheat a little because they were cut up but it was cheaper than buying them uncut) and wanted to see 1) how many things I could make and 2) how many days we could eat off those two chicken. It's currently Friday and we still have the meat from one chicken that hasn't been touched yet, these are the preparations I've come up with so far:

Chicken Stock
When I got home from the store the first thing I did was make stock and I did this for two reasons. The first of which being that Kitchen Basics stock, although delicious, is expensive and since the purpose of this experiment is to maximize use of the chicken I had to make the stock. The second reason is that I wanted the chicken to already be cooked because I hate having raw chicken around and I thought it would make cooking easier for the rest of this experiment. 

Making stock is actually quite easy. You need chicken, an onion, some celery and carrots. As stated before, I did cheat a little, the chicken was already cut up so I didn't have to bother with that AND I bought baby carrots in a bag from the store. I usually don't by bagged produce but it was on sale for $1 and I couldn't pass that up. I don't have one of those super big stock pots, so I put one chicken in a 5 qt. enameled cast iron dutch oven and the other in my 6 qt crockpot. Throw everything in the cooking vessel of your choosing, cover with water, put the lids on and walk away. 

The chicken that I cooked on the stove was done in about 3 or 4 hours over medium-low heat. The chicken I cooked in  the crockpot on low was done in about 12 hrs. In all honesty the crockpot stock was probably done WAY before 12 hrs but after I finished with the stove batch I went to sleep, the extra time doesn't hurt anything. Strain the liquid away from the solids and pick all the chicken off the bones and VIOLA you have stock. I've read that some people like to leave the veggies and blend it together.............I'm not that kind of girl. I think stock should be clear. *shrugg*

Chicken Salad
I LOVE CHICKEN SALAD, my grandmother makes it all the time and it's always delicious. I don't know why chicken salad is so tasty but it is. Chicken salad is stupidly easy to make, it's chicken, mayo, relish and mustard. People add other things, my grandmother usually adds onions and celery but Dj doesn't like the texture difference so I leave them out. I've heard of people adding craisins and/or grapes......too adventurous for me. 

Chicken Pot Pie
Another super easy chicken dish. Pot pie requires: 
half a large onion
2 potatoes
carrots
2 stalks of celery
4 cups of the stock
4 tbsp cornstarch
1 sheet of puff pastry 
half a chicken worth of picked chicken. 

Cut up the veggies, saute them for a little while and add the stock, reserve about 1/2 cup of stock. 
Add the chicken and simmer for about 10 minutes
Thoroughly mix the reserved stock with the cornstarch and pour into pot with other ingredients
Pour everything in an casserole dish and top with puff pastry. (I usually make designs with the puff pastry but you can just lay the sheet on top if you want)
Bake at 400 degrees for about 15-20 minutes or until golden brown.  

We ate this pot pie for 3 days and I didn't make one that was very big. I still have to figure out tonight and the next few days. I'm open to suggestions. 

Until next time, 
Kellan

Wednesday, November 10, 2010

Reversible Reusable Tote Bags

So I really want to stop using plastic and paper bags when I'm shopping, thus I've been looking to make some reusable bags. I've looked through TONS of blogs and I finally came across a tutorial that I like from Green and Unabashed.

I really liked the test bags but I made quite a few changes to the construction. So here's how I make reversible, reusable tote bags:

Items Needed
1 yard printed cotton or home decor fabric
1 yard solid or coordinating printed cotton or home decor fabric
thread
scissors
rotary cutter (optional but recommended)
scissors
serger (optional but recommended)
self - healing mat

**Warning: DO NOT CUT OFF THE SELVAGE! You're going to need every bit of these 2 yards of fabric. I promise the selvage will be hidden. Just trust me.**

The first step is to press your fabric then fold lengthwise and press fold flat. I suggest that when folding your fabric that you have the right side of the fabric on the inside, it makes things easier later.

Measure 6 inches from the top of the fabric and cut. Set this piece aside, we'll get back to it later.

Fold your fabric in half widthwise and measure. Hopefully you're using fabric that is 44 or 45 inches wide, which means that your halfway point should be 19 to 19.5 inches from the top, cut at your midpoint. At this point you should have two pieces of fabric that folded is 18 inches wide and 19 inches long.

Cut 3 by 3 squares from the bottom of the fabric.

Remember that 6 inch strip of fabric from earlier? It's come back into play now. So first you need to iron out the fold crease. Next make cuts every 8 inches, this will give you four 8" x 6" boxes and an extra piece.

You need a 5" x 3" template. I cut a 8" x 6" box out of a cereal box and then cut a 5" x 3" whole in the middle. You don't have to do that, honestly you could cutout a 5" x 3" box out of a piece of paper, as long as you center it. Regardless of how you make your template trace the 5" x 3" and draw something that resembles  an envelope. IT DOESN'T HAVE TO BE PERFECT!
Open the large piece of fabric and pin the box to the top, right sides together. The box should be centered on the large piece, which basically means there should be 5 inches on either side of the box. (See I told you the envelope didn't need to be perfect) 

Sew along the OUTSIDE of the box your just traced.

Cut along the inside "envelope" lines, cut as closely to the corner stitches as you can but DO NOT cut through  them.

Pull everything through the hole you just made and press the opening down.

Serge down the side and across the bottom.

Now open the holes at the bottom of the bag, lay the top of the opening on the bottom of the opening and sew closed. Repeat on the other side.

Repeat all the above instructions with the second yard of fabric. 

Once you have two bags constructed, put one inside of the other, right sides together and serge the two bags together along the top. Leave an opening so you can flip the bags to the right-side-out.
Press the seams down and top stitch.

I also top stitch along the bottom of the handle opening but that's optional.


There are a lot of steps involved but overall it's a quick process and the end result is fabulous.

Give it a try and let me know how your bags came out.

If you read this tutorial and think, "That's really cool but I'm not/can't/don't have the time to do all that" I sell these totes. http://www.etsy.com/shop/kaclopton

Until next time,
Kellan