Tuesday, December 29, 2009

Homemade Cleaners: Laundry Powder

So my first experiment was making laundry powder. (I got the idea from BrownThumbMama) I made a small variation to the recipe and my food processor hasn't come yet so I had to grate the soap by hand. I used a bar of Dr. Bronner's Magic Soap instead of Fels Naptha but I personally think it came out just as well and this way I didn't need to add the essential oil. My house smells fantastic right now, so I think this was a great experiment overall. Eventually I might get around to making the laundry liquid, but I really don't think I want to do the extra work.

This was a great investment. I have LOTS of washing soda and borax left, so there will be lots more experimenting. Overall, it's taken longer for me to write this post then it did for me to make the laundry soap. I think I could finish the whole process in less than 4 minutes once my food processor comes.

I'll try to remember to take pics for the next batch.

UPDATE:
My food processor came and I made another batch. It took me about a minute to make this batch. So here's what I did: 


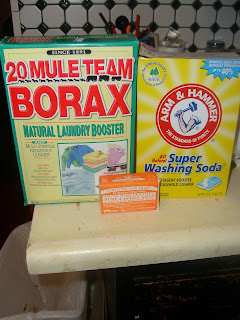
I gathered my ingredients


Grated my bar of soap (I used my food processor). 


Mixed in the borax and washing soda


Put in the scoop (I found a 2 tbsp coffee scoop in the junk drawer)


I also calculated the price per batch. Here's what I came up with:
1 cup of 20 Mule Team borax: $0.48
1 cup of Arm & Hammer Washing Soda: $0.33
1 bar Dr. Bronner's Magic Soap: $2.64
GRAND TOTAL: $3.45


Per my calculations, I think this recipe should yield about 32 load (PRETTY GOOD, RIGHT?)


Update 1/25/10: My food processor apparently cannot handle chopping up the soap. (I have a KitchenAid mini chopper). However, I do have the Shredder/Slicer attachment for my KitchenAid Stand Mixer. Thus, I grated the soap with the stand mixer, then put it into the food processor to get that fine soap dust that's needed for proper dissolution. Problem solved!


Until my next experiment......

KAC
Make Your Own Snuggie/Slanket

For Christmas this year I decided to make my friends and family Snuggies/Slankets/Blankets with sleeves (whatever you choose to call them). It takes about an hour to make one from start to finish (I made 33). Overall the process is relatively easy so here's how to make one:

Start with washing and drying 3 yards of fleece.


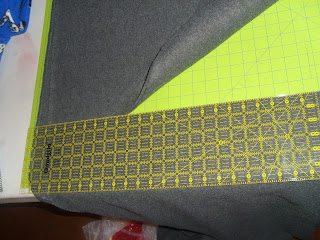
Then fold the fabric in half so that it's half of the normal width, measure 24 inches from the top.


Cut the fabric at the 24" mark, this section will be your sleeves.


Cut along the fold of the fabric to give you two pieces of fabric that are 30" wide and 24" long. Set this aside for now.


With the remaining fabric measure 20 inches from the top and 10 from the fold (this is the top of your sleeve). Your sleeve hole needs to be 9 inches from top to bottom and 6 inches from left to right. I mark my measurements with pins and use a rotary cutter to cut out the holes.


As you can see, it doesn't matter if the hole is perfect......imperfections can be covered up later.

Next, I hem the edges. To do this I fold my fabric over 1 inch.


Then fold again and pin. The second fold depends on which side of the Snuggie you're working on and your preferences. I use a 3" hem for the top and 1" to 2" for the remaining sides depending on the fabric. For this particular fabric I did a 2" seam because the fabric was very thick.


If making multiple Snuggies, I would suggest getting this much finished before moving on to the sewing. It makes things go MUCH faster.

Okay, now that it's all pinned, just sew along the outside and attach the sleeves.

Update 1/25/10: I'm still working on Christmas presents but I moved and it's been an uphill battle. I'll finish one day............hopefully. 
Until then.......